前回ではストリーミングレプリケーションの概要についてお話しましたが、第2回ではPostgreSQLのインストールとレプリケーション初期設定について解説いたします。
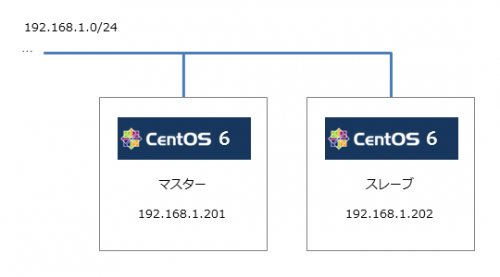
プライマリ(更新・参照可能)-セカンダリ型(参照のみ)の2台構成で進めます。
用意したもの
- サーバ2台(CentOS 6.6 64bit版をインストール済み)
以下のような構成です。

それでは早速PostgreSQLのインストールと設定を行っていきましょう。
PostgreSQLのインストール
このサーバにPostgreSQLをsourceからインストールします。
マスターとスレーブ共通です。
|
1 2 3 4 5 6 7 8 9 10 11 12 13 14 15 16 17 18 19 20 21 22 23 24 25 26 27 28 29 30 31 32 33 34 35 |
# cd /usr/local/src # yum install readline-devel zlib-devel perl-ExtUtils-Embed # wget http://ftp.postgresql.org/pub/source/v9.3.5/postgresql-9.3.5.tar.gz # useradd postgres # mkdir /usr/local/pgsql # chown -R postgres:postgres /usr/local/pgsql # tar zxf postgresql-9.3.5.tar.gz # chown -R postgres:postgres /usr/local/src/postgresql-9.3.5 # su - postgres $ cd /usr/local/src/postgresql-9.3.5 $ ./configure $ make $ make install $ vi ~postgres/.bashrc ----------------------------------- # PostgreSQL Config PG=/usr/local/pgsql PATH="$PATH":$PG/bin export MANPATH="$MANPATH":$PG/man export PGLIB=$PG/lib export PGDATA=/usr/local/pgsql/data ----------------------------------- $ source ~/.bashrc $ initdb --encoding=UTF-8 --no-locale $ exit /* 起動スクリプトの設置 */ # cd /usr/local/src/postgresql-9.3.5 # cp contrib/start-scripts/linux /etc/rc.d/init.d/postgres # chmod +x /etc/rc.d/init.d/postgres # chkconfig postgres on # /etc/rc.d/init.d/postgres start |
PostgreSQLが起動すればこれでひとまずインストールは完了。
これをマスターとスレーブの2台分行います。
マスターのレプリケーション初期設定
続いてレプリケーションを使用するための設定を行います。
マスターのpostgresql.confを修正
|
1 2 3 4 5 6 7 8 9 10 11 12 13 14 15 16 17 18 19 |
# su - postgres $ cd /usr/local/pgsql/data $ vi postgresql.conf --------------------------------------------- listen_addresses = 'localhost,192.168.1.201' port = 5432 wal_level = hot_standby /* ここでレプリケーション構成を設定しますが、ひとまず完全同期に設定 */ synchronous_commit = on max_wal_senders = 3 synchronous_standby_names = '*' /* ログの出力も設定 */ log_destination = 'syslog' syslog_facility = 'LOCAL0' syslog_ident = 'postgres' --------------------------------------------- |
レプリケーション用ユーザーの作成
ユーザー名は何でも良いのですが、今回は「replicationuser」というユーザーでパスワードを「pass1234」と設定します。
|
1 2 3 4 |
$ psql postgres=# CREATE ROLE replicationuser LOGIN REPLICATION PASSWORD 'pass1234'; CREATE ROLE postgres=# \q |
pg_hba.confを編集しアクセス設定を行う
|
1 2 3 4 5 6 |
$ cd /usr/local/pgsql/data $ vi pg_hba.conf ----------------------------------------------------------------------------- host replication replicationuser 192.168.1.0/24 md5 ----------------------------------------------------------------------------- $ exit |
ちなみに「host replication replicationuser」ではなく「host all replicationuser」にしたら、後述のpg_basebackupでpg_hba.confのエラーが出てしまいました。
設定を反映
|
1 |
# /etc/rc.d/init.d/postgres restart |
スレーブのレプリケーション初期設定
pg_basebackupによるデータコピー
PosgreSQLを停止し、レプリケーションするためにpg_basebackupというコマンドを使用して、マスターのdata領域を持ってきます。
|
1 2 3 4 5 6 7 8 9 10 |
# /etc/rc.d/init.d/postgres stop # su - postgres $ rm -rf /usr/local/pgsql/data $ pg_basebackup -h 192.168.1.201 -D /usr/local/pgsql/data --xlog $ cd /usr/local/pgsql/data $ vi /usr/local/pgsql/data/postgresql.conf --------------------------------------------- listen_addresses = 'localhost,192.168.1.202' hot_standby = on --------------------------------------------- |
recovery.confの設定
|
1 2 3 4 5 6 7 8 9 |
$ vi /usr/local/pgsql/data/recovery.conf ------------------------------------------------------------------------------------------------------------ standby_mode = 'on' /* ここでは自分自身をapplication_nameで「slave」という名前を指定し 先ほど作成した「replicationuser」ユーザーでマスターに接続する設定を行います。 */ primary_conninfo = 'host=192.168.1.201 port=5432 user=replicationuser password=pass1234 application_name=slave' ------------------------------------------------------------------------------------------------------------ $ exit |
PostgreSQLを起動
|
1 |
# /etc/rc.d/init.d/postgres start |
動作確認
マスター側でtest1というデータベースを作成し、スレーブに反映されるか確認してみます。
マスター側でデータベース作成
|
1 2 3 4 5 6 7 8 9 10 11 12 13 14 15 16 17 18 19 20 21 22 23 24 |
# su - postgres $ psql -l List of databases Name | Owner | Encoding | Collate | Ctype | Access privileges -----------+----------+----------+---------+-------+----------------------- postgres | postgres | UTF8 | C | C | template0 | postgres | UTF8 | C | C | =c/postgres + | | | | | postgres=CTc/postgres template1 | postgres | UTF8 | C | C | =c/postgres + | | | | | postgres=CTc/postgres (3 rows) $ createdb test1 $ psql -l List of databases Name | Owner | Encoding | Collate | Ctype | Access privileges -----------+----------+----------+---------+-------+----------------------- postgres | postgres | UTF8 | C | C | template0 | postgres | UTF8 | C | C | =c/postgres + | | | | | postgres=CTc/postgres template1 | postgres | UTF8 | C | C | =c/postgres + | | | | | postgres=CTc/postgres test1 | postgres | UTF8 | C | C | (4 rows) |
test1というデータベースが作成されました。
スレーブ側で反映を確認
|
1 2 3 4 5 6 7 8 9 10 11 12 |
# su - postgres $ psql -l List of databases Name | Owner | Encoding | Collate | Ctype | Access privileges -----------+----------+----------+---------+-------+----------------------- postgres | postgres | UTF8 | C | C | template0 | postgres | UTF8 | C | C | =c/postgres + | | | | | postgres=CTc/postgres template1 | postgres | UTF8 | C | C | =c/postgres + | | | | | postgres=CTc/postgres test1 | postgres | UTF8 | C | C | (4 rows) |
スレーブ側でも無事test1というデータベースが作成されていることが確認できました。
ちなみにスレーブは参照専用なので、例えばスレーブ側でtest1データベースを削除しようとしてもリードオンリーだというエラーが出て削除できません。
|
1 2 |
$ dropdb test1 dropdb: database removal failed: ERROR: cannot execute DROP DATABASE in a read-only transaction |
まとめ
というわけで、無事レプリケーション環境構築ができました。実際にちゃんと動作すると嬉しいですね。
次回は「第3回 レプリケーション構成によるパフォーマンス比較」です。
今回設定したレプリケーションがレプリケーション構成別にどのようなパフォーマンスを発揮するのかを比較したいと思います。お楽しみに!


![群馬の法人ITサポートサービス Wide Net[ワイドネット] 群馬の法人ITサポートサービス Wide Net[ワイドネット]](https://www.nedia.ne.jp/wp-content/themes/nedia/images/bnr_bt_widenet02.png)


![群馬の法人ITサポートサービス Wide Net[ワイドネット] 群馬の法人ITサポートサービス Wide Net[ワイドネット]](https://www.nedia.ne.jp/wp-content/themes/nedia/images/bnr_bt_widenet03.png)


