二回目である今回はDockerの基本操作について解説します。こちら )
コンテナ操作の基本
Dockerイメージの入手
最初に、基本となるDockerイメージを入手します。Dockerイメージは、Docker Hub Registry(https://hub.docker.com/)にて公開されています。
Dockerイメージの検索
# docker search centos

INDEX       NAME                                      DESCRIPTION                                     STARS     OFFICIAL   AUTOMATED
docker.io   docker.io/centos                          The official build of CentOS.                   1842      [OK]
docker.io   docker.io/ansible/centos7-ansible         Ansible on Centos7                              63                   [OK]
docker.io   docker.io/jdeathe/centos-ssh              CentOS-6 6.7 x86_64 / EPEL/IUS Repos / Ope...   14                   [OK]
docker.io   docker.io/jdeathe/centos-ssh-apache-php   CentOS-6 6.7 x86_64 / Apache / PHP / PHP M...   11                   [OK]
docker.io   docker.io/million12/centos-supervisor     Base CentOS-7 with supervisord launcher, h...   9                    [OK]
docker.io   docker.io/blalor/centos                   Bare-bones base CentOS 6.5 image                8                    [OK]
docker.io   docker.io/nimmis/java-centos              This is docker images of CentOS 7 with dif...   7                    [OK]
docker.io   docker.io/torusware/speedus-centos        Always updated official CentOS docker imag...   7                    [OK]
docker.io   docker.io/consol/centos-xfce-vnc          Centos container with "headless" VNC sessi...   5                    [OK]
docker.io   docker.io/jdeathe/centos-ssh-mysql        CentOS-6 6.7 x86_64 / MySQL.                    4                    [OK]
docker.io   docker.io/nathonfowlie/centos-jre         Latest CentOS image with the JRE pre-insta...   3                    [OK]
docker.io   docker.io/centos/mariadb55-centos7                                                        2                    [OK]
docker.io   docker.io/nickistre/centos-lamp           LAMP on centos setup                            2                    [OK]
docker.io   docker.io/feduxorg/centos-postgresql      Centos Image with postgres                      1                    [OK]
docker.io   docker.io/layerworx/centos                CentOS container with etcd, etcdctl, confd...   1                    [OK]
docker.io   docker.io/lighthopper/orientdb-centos     A Dockerfile for creating an OrientDB imag...   1                    [OK]
docker.io   docker.io/nathonfowlie/centos-jira        JIRA running on the latest version of CentOS    1                    [OK]
docker.io   docker.io/softvisio/centos                Centos                                          1                    [OK]
docker.io   docker.io/yajo/centos-epel                CentOS with EPEL and fully updated              1                    [OK]
docker.io   docker.io/blacklabelops/centos            Blacklabelops Centos 7 base image without ...   0                    [OK]
docker.io   docker.io/januswel/centos                 yum update-ed CentOS image                      0                    [OK]
docker.io   docker.io/jsmigel/centos-epel             Docker base image of CentOS w/ EPEL installed   0                    [OK]
docker.io   docker.io/lighthopper/openjdk-centos      A Dockerfile for creating an OpenJDK image...   0                    [OK]
docker.io   docker.io/pdericson/centos                Docker image for CentOS                         0                    [OK]
docker.io   docker.io/timhughes/centos                Centos with systemd installed and running       0                    [OK]
様々なイメージを様々な人が公開しています。OFFICIALの欄に[OK]と表示されているものが、CentOSのオフィシャルイメージです。あらかじめアプリケーションをインストールしたものがいくつも公開されています。
Dockerイメージのダウンロード例
# docker pull centos

Using default tag: latest
Trying to pull repository docker.io/library/centos ... latest: Pulling from library/centos
47d44cb6f252: Pull complete
838c1c5c4f83: Pull complete
5764f0a31317: Pull complete
60e65a8e4030: Pull complete
library/centos:latest: The image you are pulling has been verified. Important: image verification is a tech preview feature and should not be relied on to provide security.
Digest: sha256:8072bc7c66c3d5b633c3fddfc2bf12d5b4c2623f7004d9eed6aae70e0e99fbd7
Status: Downloaded newer image for docker.io/centos:latest
この例のように、いくつかのイメージが一括してダウンロードされます。ダウンロードしたイメージは、次のようにして確認することができます。
# docker images

REPOSITORY          TAG                 IMAGE ID            CREATED             VIRTUAL SIZE
①docker.io/centos    latest              60e65a8e4030        3 weeks ago         196.6 MB
・
・
Dockerのイメージは、リポジトリとタグを”:”で区切って指定します。例えば、①のCentOS 7 のイメージは、docker.io/centos:latestという名称で利用します。
コンテナの作成
コンテナの起動というのは、このイメージの上でプロセスを起動することを指します。Dockerは指定したイメージを展開し、コンテナのファイルシステムセットとして使用します。
docker run [<options>] <image> <command> [<arg>]
使用するイメージをで、そのイメージ上で動かすコマンドとその引数をとで指定します。
docker.io/centos:latest というイメージでbashを起動する「centos7」という名前のコンテナを作成する場合のコマンドがこちらです。
・基本的なコンテナの起動例
# docker run -it --name centos7 docker.io/centos:latest /bin/bash

[root@b18de31e55ec /]#ls
anaconda-post.log  bin  dev  etc  home  lib  lib64  lost+found  media  mnt  opt  proc  root  run  sbin  srv  sys  tmp  usr  var
この例では、docker run にオプションとして「-it」を付けています。これは対話(Interactive)モードで、TTY(端末・コンソール)を割り当てるという指定です。
・コンテナの停止
[root@b18de31e55ec /]# exit
コンテナを停止することなく、操作を元のシェルに戻したい場合には、Ctrl-P + Ctrl-qでコンテナのTTYを抜けることができます。
コンテナへの再接続
動作しているコンテナに接続するには、次のようにdocker attach コマンドにコンテナ名を指定して実行します。
・コンテナへの再接続
# docker attach centos7		…エラーがなければ接続できている
				…改行するとプロンプトが出る

[root@b18de31e55ec /]#

[root@b18de31e55ec /]# ls
anaconda-post.log  bin  dev  etc  home  lib  lib64  lost+found  media  mnt  opt  proc  root  run  sbin  srv  sys  tmp  usr  var
動作中のコンテナの確認
動作中のコンテナを調べるには、docker ps コマンドを使います。
# docker ps
CONTAINER ID        IMAGE                     COMMAND             CREATED             STATUS              PORTS               NAMES
b18de31e55ec        docker.io/centos:latest   "/bin/bash"         9 minutes ago       Up 9 minutes                            centos7

-aオプションを指定すると、停止中のコンテナも表示されます。

# docker ps -a
8cc776959b0f        docker.io/centos:latest   "/bin/bash"         5 seconds ago       Exited (0) 1 seconds ago                       centos7a
b18de31e55ec        docker.io/centos:latest   "/bin/bash"         14 minutes ago      Up 14 minutes                                  centos7
コンテナ情報の確認
Dockerのコンテナの詳細な状態を知りたい場合には、docker inspectを使います。Dockerの起動時に指定したプロセスや、コンテナに割り当てたリソースなどを確認することができます。
# docker inspect centos7
[
{
    "Id": "b18de31e55ec5c02721193fab1d815f9b5fd3d32eebad4b86330b792a5ce2c0a",
    "Created": "2016-01-19T11:17:47.272087891Z",
    "Path": "/bin/bash",
    "Args": [],
    "State": {
        "Running": true,
        "Paused": false,
        "Restarting": false,
        "OOMKilled": false,
        "Dead": false,
        "Pid": 2563,
        "ExitCode": 0,
        "Error": "",
        "StartedAt": "2016-01-19T11:17:47.685386072Z",
        "FinishedAt": "0001-01-01T00:00:00Z"
    },
    "Image": "60e65a8e4030022260a4f84166814b2683e1cdfc9725a9c262e90ba9c5ae2332",
    "NetworkSettings": {
        "Bridge": "",
        "EndpointID": "4aeb09fdcce86c3d8c76115f222657844dc4fa7ca0d56d8b997e6d1708d42717",
        "Gateway": "172.17.42.1",
        "GlobalIPv6Address": "",
        "GlobalIPv6PrefixLen": 0,
        "HairpinMode": false,
        "IPAddress": "172.17.0.1",
        "IPPrefixLen": 16,
        "IPv6Gateway": "",
        "LinkLocalIPv6Address": "",
        "LinkLocalIPv6PrefixLen": 0,
        "MacAddress": "02:42:ac:11:00:01",
        "NetworkID": "b1d897f4c186fdaffcebd0ed10a57721ed871efad61bba223f74d362ddd47b31",
        "PortMapping": null,
        "Ports": {},
        "SandboxKey": "/var/run/docker/netns/b18de31e55ec",
        "SecondaryIPAddresses": null,
        "SecondaryIPv6Addresses": null
    },
    "ResolvConfPath": "/var/lib/docker/containers/b18de31e55ec5c02721193fab1d815f9b5fd3d32eebad4b86330b792a5ce2c0a/resolv.conf",
    "HostnamePath": "/var/lib/docker/containers/b18de31e55ec5c02721193fab1d815f9b5fd3d32eebad4b86330b792a5ce2c0a/hostname",
    "HostsPath": "/var/lib/docker/containers/b18de31e55ec5c02721193fab1d815f9b5fd3d32eebad4b86330b792a5ce2c0a/hosts",
    "LogPath": "/var/lib/docker/containers/b18de31e55ec5c02721193fab1d815f9b5fd3d32eebad4b86330b792a5ce2c0a/b18de31e55ec5c02721193fab1d815f9b5fd3d32eebad4b86330b792a5ce2c0a-json.log",
    "Name": "/centos7",
    "RestartCount": 0,
    "Driver": "devicemapper",
    "ExecDriver": "native-0.2",
    "MountLabel": "",
    "ProcessLabel": "",
    "AppArmorProfile": "",
    "ExecIDs": null,
    "HostConfig": {
        "Binds": null,
        "ContainerIDFile": "",
        "LxcConf": [],
        "Memory": 0,
        "MemorySwap": 0,
        "CpuShares": 0,
        "CpuPeriod": 0,
        "CpusetCpus": "",
        "CpusetMems": "",
        "CpuQuota": 0,
        "BlkioWeight": 0,
        "OomKillDisable": false,
        "MemorySwappiness": -1,
        "Privileged": false,
        "PortBindings": {},
        "Links": null,
        "PublishAllPorts": false,
        "Dns": null,
        "DnsSearch": null,
        "ExtraHosts": null,
        "VolumesFrom": null,
        "Devices": [],
        "NetworkMode": "default",
        "IpcMode": "",
        "PidMode": "",
        "UTSMode": "",
        "CapAdd": null,
        "CapDrop": null,
        "GroupAdd": null,
        "RestartPolicy": {
            "Name": "no",
            "MaximumRetryCount": 0
        },
        "SecurityOpt": null,
        "ReadonlyRootfs": false,
        "Ulimits": null,
        "LogConfig": {
            "Type": "json-file",
            "Config": {}
        },
        "CgroupParent": "",
        "ConsoleSize": [
            0,
            0
        ]
    },
    "GraphDriver": {
        "Name": "devicemapper",
        "Data": {
            "DeviceId": "7",
            "DeviceName": "docker-253:1-67259332-b18de31e55ec5c02721193fab1d815f9b5fd3d32eebad4b86330b792a5ce2c0a",
            "DeviceSize": "107374182400"
        }
    },
    "Mounts": [],
    "Config": {
        "Hostname": "b18de31e55ec",
        "Domainname": "",
        "User": "",
        "AttachStdin": true,
        "AttachStdout": true,
        "AttachStderr": true,
        "ExposedPorts": null,
        "PublishService": "",
        "Tty": true,
        "OpenStdin": true,
        "StdinOnce": true,
        "Env": null,
        "Cmd": [
            "/bin/bash"
        ],
        "Image": "docker.io/centos:latest",
        "Volumes": null,
        "VolumeDriver": "",
        "WorkingDir": "",
        "Entrypoint": null,
        "NetworkDisabled": false,
        "MacAddress": "",
        "OnBuild": null,
        "Labels": {}
    }
}
]
コンテナの停止
動作しているコンテナをホスト側から停止することもできます。次のようなdocker stop コマンドにコンテナ名を指定して実行します。
コンテナの停止
# docker stop centos7
centos7
この処理を行うと、コンテナプロセスには、TERMシグナル、KILLシグナルが送られます。つまり、コンテナプロセスを強制終了することになります。
コンテナの起動
停止しているコンテナを再度動かすこともできます。次のようにdocker startコマンドにコンテナ名を指定して実行します。
・コンテナの起動
# docker start centos7
コンテナの再起動
動作しているコンテナを再起動するには、docker restart コマンドを使います。このコマンドを実行すると、コンテナのプロセスを強制終了し、再度スタートします。
# docker restart centos7
centos7
コンテナのコミット
コンテナの中でファイルを編集しても、コンテナを削除するとすべて変更は削除されてしまいます。ただし、コンテナの状態を新しいイメージとして保管することができます。
・コンテナのコミット
# docker commit -a Takeshi_Sato -m "CentOS 7 test image" centos7 localrepo:test
32f79088593dc06e79c3fed9e0732ec7a35f179034e6faf3f4b11db906fee925

保管したイメージは、docker imageで確認することができます。

# docker images localrepo
REPOSITORY          TAG                 IMAGE ID            CREATED             VIRTUAL SIZE
localrepo           test                32f79088593d        15 seconds ago      196.6 MB
コンテナの削除
作成したコンテナを削除するには、docker rm を使います。コンテナを削除すると、コンテナ内で作成したファイルなどはすべて破棄されてしまいますので、保管が必要な場合にはあらかじめ docker commit で新しいイメージとして保管する必要があります。
・コンテナの削除
# docker rm -f centos7
centos7

コンテナの削除は、停止中にしか行えません。強制的にコンテナを停止して削除する場合には、-fオプションを使います。

・コンテナの強制削除
# docker rm -f cents7
アプリケーション環境のコンテナ化とサービスの公開
Dockerは、KVMなどの仮想マシンに比べるとはるかに小さいサイズでイメージを管理することが出来ます。そのため、アプリケーションの実行環境とアプリケーションやコンテンツを一緒にDockerイメージとして保存し、バージョン管理なども行うことが出来ます。
なお、次のような手順で作成していきます。(1)WWWサーバの元となるコンテナを作成する (2)WWWサーバの設定を行う (3)WWWコンテンツを配置する (4)イメージを保存する(コンテナ化) (5)保存したイメージで新しいコンテナを作成し、動作確認をする (6)コンテナサービスの公開
今後の実行例ではコンテナの上で実行すべきものと、ホスト上で実行すべきものがあります。紛らわしいため、ホスト側で実行すべきものには、(ホスト上)、コンテナ上で実行べきものには、(コンテナ上)と明記します。
(1)WWWサーバの元となるコンテナを作成する
最初に、WWWサーバの元となるコンテナを作成します。centos7の公式イメージを使って、/bin/bashを起動します。このとき、ホストからWWWコンテンツを渡すためにボリュームを共有しておきます。WWWコンテンツが入っているディレクトリ(ここでは/home/admin/html)を共有します。
・コンテナの作成(ホスト上)
# docker run -it --name webserver-devel --volume=/home/admin/html:/mnt centos:7 /bin/bash

Unable to find image 'centos:7' locally
Trying to pull repository docker.io/library/centos ... 7: Pulling from library/centos
f5079557f135: Pull complete
42c2aa730369: Pull complete
0e0217391d41: Pull complete
47d44cb6f252: Already exists
library/centos:7: The image you are pulling has been verified. Important: image verification is a tech preview feature and should not be relied on to provide security.
Digest: sha256:8dcd2ec6183f3f4a94d4f9552ce76091624760edefcaa39a9e04441f9e2ad9f6
Status: Downloaded newer image for docker.io/centos:7
ホストボリュームのマウントについての解説
–volumeオプションを使って、ホストのボリューム(/home/admin/html)をコンテナの/mntにマウントしています。なおホストボリュームのマウントは、次のような用途にで利用できます。
ホストからコンテナへのファイルの受け渡し
コンテナ間でのファイル共有
コンテナのデータの保存
コンテナで作成したファイルは、コンテナを削除すると削除されてしまいますが、マウントしてある領域のファイルを変更すれば、そのままホスト側に反映されます。
(2)WWWサーバの設定を行う
作成したコンテナにWWWサーバをインストールします。
・httpdのインストール(コンテナ上)
[root@168f748a722c /]# yum install httpd
Loaded plugins: fastestmirror, ovl
base                                                                                                               | 3.6 kB  00:00:00
extras                                                                                                             | 3.4 kB  00:00:00
updates                                                                                                            | 3.4 kB  00:00:00
(1/4): base/7/x86_64/group_gz                                                                                      | 155 kB  00:00:00
(2/4): extras/7/x86_64/primary_db                                                                                  | 101 kB  00:00:00
(3/4): base/7/x86_64/primary_db                                                                                    | 5.3 MB  00:00:00
(4/4): updates/7/x86_64/primary_db                                                                                 | 3.1 MB  00:00:06
Determining fastest mirrors
 * base: ftp.iij.ad.jp
 * extras: ftp.iij.ad.jp
 * updates: ftp.iij.ad.jp
Resolving Dependencies
--> Running transaction check
---> Package httpd.x86_64 0:2.4.6-40.el7.centos will be installed
--> Processing Dependency: httpd-tools = 2.4.6-40.el7.centos for package: httpd-2.4.6-40.el7.centos.x86_64
--> Processing Dependency: system-logos >= 7.92.1-1 for package: httpd-2.4.6-40.el7.centos.x86_64
--> Processing Dependency: /etc/mime.types for package: httpd-2.4.6-40.el7.centos.x86_64
--> Processing Dependency: libaprutil-1.so.0()(64bit) for package: httpd-2.4.6-40.el7.centos.x86_64
--> Processing Dependency: libapr-1.so.0()(64bit) for package: httpd-2.4.6-40.el7.centos.x86_64
--> Running transaction check
---> Package apr.x86_64 0:1.4.8-3.el7 will be installed
---> Package apr-util.x86_64 0:1.5.2-6.el7 will be installed
---> Package centos-logos.noarch 0:70.0.6-3.el7.centos will be installed
---> Package httpd-tools.x86_64 0:2.4.6-40.el7.centos will be installed
---> Package mailcap.noarch 0:2.1.41-2.el7 will be installed
--> Finished Dependency Resolution

Dependencies Resolved

==========================================================================================================================================
 Package                           Arch                        Version                                    Repository                 Size
==========================================================================================================================================
Installing:
 httpd                             x86_64                      2.4.6-40.el7.centos                        base                      2.7 M
Installing for dependencies:
 apr                               x86_64                      1.4.8-3.el7                                base                      103 k
 apr-util                          x86_64                      1.5.2-6.el7                                base                       92 k
 centos-logos                      noarch                      70.0.6-3.el7.centos                        base                       21 M
 httpd-tools                       x86_64                      2.4.6-40.el7.centos                        base                       82 k
 mailcap                           noarch                      2.1.41-2.el7                               base                       31 k

Transaction Summary
==========================================================================================================================================
Install  1 Package (+5 Dependent packages)

Total download size: 24 M
Installed size: 31 M
Is this ok [y/d/N]: y
Downloading packages:
warning: /var/cache/yum/x86_64/7/base/packages/apr-util-1.5.2-6.el7.x86_64.rpm: Header V3 RSA/SHA256 Signature, key ID f4a80eb5: NOKEY
Public key for apr-util-1.5.2-6.el7.x86_64.rpm is not installed
(1/6): apr-util-1.5.2-6.el7.x86_64.rpm                                                                             |  92 kB  00:00:00
(2/6): apr-1.4.8-3.el7.x86_64.rpm                                                                                  | 103 kB  00:00:00
(3/6): httpd-2.4.6-40.el7.centos.x86_64.rpm                                                                        | 2.7 MB  00:00:00
(4/6): httpd-tools-2.4.6-40.el7.centos.x86_64.rpm                                                                  |  82 kB  00:00:00
(5/6): mailcap-2.1.41-2.el7.noarch.rpm                                                                             |  31 kB  00:00:00
(6/6): centos-logos-70.0.6-3.el7.centos.noarch.rpm                                                                 |  21 MB  00:00:02
------------------------------------------------------------------------------------------------------------------------------------------
Total                                                                                                     7.7 MB/s |  24 MB  00:00:03
Retrieving key from file:///etc/pki/rpm-gpg/RPM-GPG-KEY-CentOS-7
Importing GPG key 0xF4A80EB5:
 Userid     : "CentOS-7 Key (CentOS 7 Official Signing Key) <security@centos.org>"
 Fingerprint: 6341 ab27 53d7 8a78 a7c2 7bb1 24c6 a8a7 f4a8 0eb5
 Package    : centos-release-7-2.1511.el7.centos.2.10.x86_64 (@CentOS)
 From       : /etc/pki/rpm-gpg/RPM-GPG-KEY-CentOS-7

Is this ok [y/N]: y
Running transaction check
Running transaction test
Transaction test succeeded
Running transaction
  Installing : apr-1.4.8-3.el7.x86_64                                                                                                 1/6
  Installing : apr-util-1.5.2-6.el7.x86_64                                                                                            2/6
  Installing : httpd-tools-2.4.6-40.el7.centos.x86_64                                                                                 3/6
  Installing : centos-logos-70.0.6-3.el7.centos.noarch                                                                                4/6
  Installing : mailcap-2.1.41-2.el7.noarch                                                                                            5/6
  Installing : httpd-2.4.6-40.el7.centos.x86_64                                                                                       6/6
  Verifying  : httpd-2.4.6-40.el7.centos.x86_64                                                                                       1/6
  Verifying  : httpd-tools-2.4.6-40.el7.centos.x86_64                                                                                 2/6
  Verifying  : apr-1.4.8-3.el7.x86_64                                                                                                 3/6
  Verifying  : mailcap-2.1.41-2.el7.noarch                                                                                            4/6
  Verifying  : apr-util-1.5.2-6.el7.x86_64                                                                                            5/6
  Verifying  : centos-logos-70.0.6-3.el7.centos.noarch                                                                                6/6

Installed:
  httpd.x86_64 0:2.4.6-40.el7.centos

Dependency Installed:
  apr.x86_64 0:1.4.8-3.el7                         apr-util.x86_64 0:1.5.2-6.el7         centos-logos.noarch 0:70.0.6-3.el7.centos
  httpd-tools.x86_64 0:2.4.6-40.el7.centos         mailcap.noarch 0:2.1.41-2.el7

Complete!
必要があればWWWサーバの設定ファイルを編集し、設定を整えます。
設定ファイルの編集(コンテナ上)
[root@168f748a722c /]# cp -a /etc/httpd/conf/httpd.conf /etc/httpd/conf/httpd.conf_org
[root@168f748a722c /]# vi /etc/httpd/conf/httpd.conf
(3)WWWコンテンツを配置する
DockerコンテナにWWWコンテンツを配置します。/mntにマウントしたホストボリュームからファイルをコピーします。ただし、通常の状態のままではSELinuxの制限でファイルにアクセスすることができません。
・WWWコンテンツのコンテキストの変更(ホスト上)
# chcon -R system_u:object_r:docker_var_lib_t:s0 /home/admin/html

コンテンツの配置(テストなので下記のように済ませてもOKです)
# vi /home/admin/html/index.html
test
Dockerコンテナ内で適切なディレクトリーにコピーします。
・WWWコンテンツのコピー(コンテナ上)
[root@168f748a722c]# cp -rp /mnt/* /var/www/html/

 コピーが終了したら、ホスト側のファイルのコンテキストを元に戻しておきましょう。
・WWWコンテンツのコンテキストの変更(ホスト上)
# restorecon -R /home/admin/html
(4)イメージを保存する(コンテナ化)
WWWサーバの設定が終わりコンテンツを配置したところで、コンテナを停止し、ホスト側でdocker commitを実行しコンテナのイメージを保存します。
・コンテナの停止とイメージの保存(コンテナ上からホストへ)
[root@168f748a722c]# exit

# docker commit -a NSCG -m "CentOS 7 webserver" webserver-devel localrepo:webserver-1
3e8ac2d724a929d2696a796ac6a9a06e90cfe847bc106f93c11ff6bfa874fc52
これで、アプリケーションとコンテンツを含んだイメージが完成しました。イメージを保管したら、作業に利用したコンテナは一旦削除しておきましょう。
・コンテナの削除(ホスト上)
# docker rm webserver-devel
webserver-devel
(5)保存したイメージで新しいコンテナを作成し、動作確認する。
保存したイメージを使って、動作確認用にWWWサーバ用のコンテナを作成します。このコンテナでは、WWWサーバ(/usr/sbin/httpd)を起動します。
WWWサーバ用コンテナの作成(ホスト上)
# docker run -d --name webserver --expose=80 localrepo:webserver-1 /usr/sbin/httpd -D FOREGROUND
09a84be4de6be2a33831a338ebd780cf1c582be3c999aa8b1ee8ea928da31665
これで、コンテナ上でWWWサーバが動作しているはずです。この状態でホストからコンテナの80ポートにアクセスして動作を確認します。
・IPアドレスの調査
コンテナに割り当てられたIPアドレスの確認(ホスト上)

# docker inspect webserver | grep -i addres

    "IPAddress": "172.17.0.4",

# ping 172.17.0.4
PING 172.17.0.4 (172.17.0.4) 56(84) bytes of data.
64 bytes from 172.17.0.4: icmp_seq=1 ttl=64 time=0.098 ms
64 bytes from 172.17.0.4: icmp_seq=2 ttl=64 time=0.196 ms
^C
--- 172.17.0.4 ping statistics ---
2 packets transmitted, 2 received, 0% packet loss, time 1001ms
rtt min/avg/max/mdev = 0.098/0.147/0.196/0.049 ms

# nmap 172.17.0.4
Starting Nmap 6.40 ( http://nmap.org ) at 2016-02-23 10:31 JST
Nmap scan report for 172.17.0.4
Host is up (0.0000090s latency).
Not shown: 999 closed ports
PORT   STATE SERVICE
80/tcp open  http

Nmap done: 1 IP address (1 host up) scanned in 0.12 seconds
(6)コンテナサービスの公開
動作確認をして問題がなければ、コンテナサービスを外部に公開することができます。ます、一旦コンテナを終了し削除します。
コンテナの終了(ホスト上)
# docker rm -f webserver
webserver
次に、正式なWWWサーバのコンテナを作成します。この時、–publishをつけてホストのポートとコンテナのポートを接続します。
外部からアクセスできるコンテナの作成(ホスト上)
# docker run -d --name webserver --expose=80 --publish 80:80 localrepo:webserver-1 /usr/sbin/httpd -D FOREGROUND
9daf1f23ca7cf7c2fcbf9c571f7b714f7e1b3b29948dc16cb5983823a5c5f19c
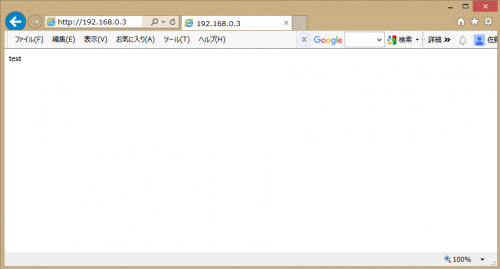
ブラウザでアクセスしてコンテンツが表示されれば成功です。(192.168.0.3がホストOSのIPアドレスです。)
Dockerの基本的な使い方の説明は以上となります。
まとめ
いかがでしたでしょうか?
実際にDockerを使い始める場合には、やはりテスト環境としての利用からが考えれます。リスクを抑えながらDockerの持ち味を生かせるためです。最初にテストに必要な設定を構築し、Dockerイメージとして保存しておくことで、簡単に元の環境に戻すことが可能です。
そして次のステップとしては、開発環境にDockerを利用をお勧めします。環境によってエラーが発生することがなくなるため、例えば開発チームに外部の企業が加わった際に、開発環境が配布出来る状態(コンテナ)として完成していれば、開発に取り掛かってもらうための時間も大分節約できるはずです。
最終的なステップとしては、本番環境として今回紹介したようにWEBサービスの提供等の利用が考えれらます。動作が軽いという利点を生かせますし、公開期間が終了した際には、コンテナをイメージ化して保存することで、再度必要になった時にも環境ごと復元できます。
こうしたメリットを考えれば、Dockerの導入を検討する価値は十分あるはずですので、この記事を参考にDockerに触れてみてもらえれば幸いです。
それでは。



![群馬の法人ITサポートサービス Wide Net[ワイドネット] 群馬の法人ITサポートサービス Wide Net[ワイドネット]](https://www.nedia.ne.jp/wp-content/themes/nedia/images/bnr_bt_widenet02.png)





![群馬の法人ITサポートサービス Wide Net[ワイドネット] 群馬の法人ITサポートサービス Wide Net[ワイドネット]](https://www.nedia.ne.jp/wp-content/themes/nedia/images/bnr_bt_widenet03.png)


